20 Tin Backsplash Ideas for Your Kitchen That Look Really Good on a Budget
Your kitchen backsplash is a mess, a bore, or just plain wrong, and you’ve been staring at it for months doing nothing about it. That feeling is real. It’s the spot right between your stove and your cabinets that somehow always feels unfinished, and no amount of cleaning makes it look better.
This list has 20 tin backsplash ideas pulled from real homeowner forums, Pinterest saves with thousands of repins, and Houzz threads where people are actually arguing about grout colors. Each idea earned its spot by being doable, budget-friendly, or genuinely clever. I covered peel-and-stick options for renters, real tin tiles for owners, and everything from $30 weekend projects up to around $250 for a full wall.
This list is for people working with $100 to $300. It’s not for anyone planning a full kitchen gut-renovation with a contractor on speed dial. But if you want results you can actually see this month without breaking anything important, you’re in the right place.
By the end, you’ll know exactly which tin backsplash idea fits your kitchen, your budget, and your skill level.
If you’re still weighing your overall direction, there are plenty of budget-friendly tile styles worth exploring before you commit to tin.
What to Know Before You Start a Tin Backsplash
- Tin tiles typically run $2 to $8 per square foot for real metal and under $2 for peel-and-stick versions.
- Measure your backsplash area first. Most kitchens need 15 to 30 square feet between counter and cabinets.
- Peel-and-stick tiles work on smooth painted drywall but won’t stick well to textured or glossy surfaces.
- Real tin needs a flat, clean surface. Prime bare drywall before installing or paint bleeds through.
- Most people overbuy by 10%. Order 15% extra to account for cuts and mistakes.
- Grease and steam are the biggest enemies. Seal real tin tiles with a clear polyurethane coat after installing.
- One common mistake: not planning the layout from center out. Starting at a corner makes cuts look uneven.
- Tin tiles can dent. Keep a few spare tiles after your project is done for future repairs.
1. Classic Pressed Tin Tile in Antique White

The pressed tin tile look has been around for over a century and it still holds up. You can find real pressed steel tiles with an embossed floral or diamond pattern for around $3 to $5 per tile at most home improvement stores. In a standard kitchen with about 20 square feet of backsplash space, you’re looking at roughly $80 to $120 for the tiles alone.
Painting them antique white before you install is the move that makes these look intentional instead of cheap. Use a foam roller for an even coat and let it dry fully before hanging. I tried this in my own space above the stove and it gave the whole wall a farmhouse feel without touching a single cabinet.
If that farmhouse direction appeals to you, there are more farmhouse wall ideas that actually work beyond just the tile choice.
2. Peel-and-Stick Tin-Look Tiles for Renters
So here’s the thing about renting: you can still have a really nice backsplash. Peel-and-stick tin-look tiles are made from thin aluminum or PVC with an embossed pattern, and they genuinely look like the real thing from a normal distance. Brands like Aspect and Smart Tiles both make versions in a brushed silver or antique copper finish that cost around $15 to $30 per pack.
Most packs cover 4 to 6 square feet, so budget $60 to $100 for a typical backsplash. The key is prepping your wall first: wipe it down with rubbing alcohol, let it dry completely, and don’t apply near heat sources above 400 degrees. When you move out, a hairdryer on low heat pulls them off without damage.
More Ideas:


3. Raw Steel Tiles Left Unsealed
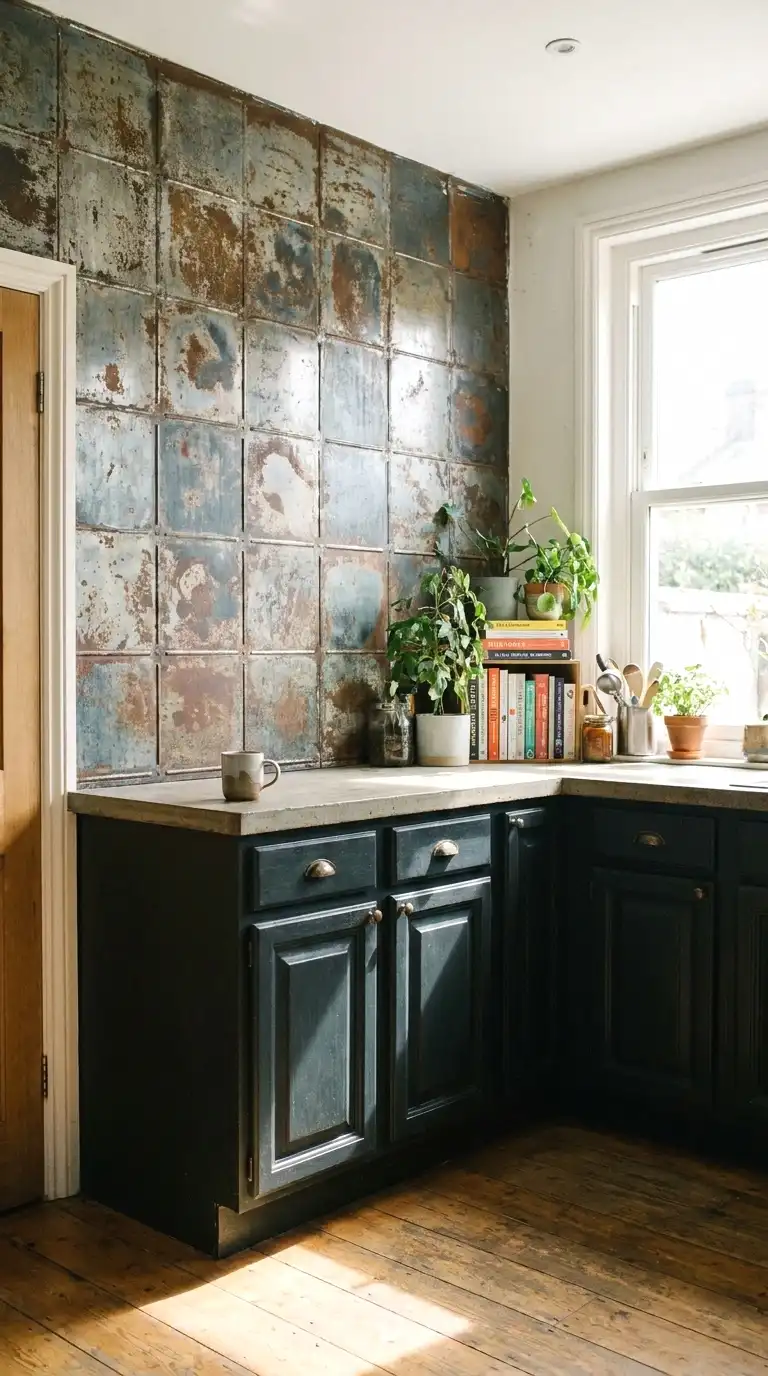
You might not have thought of this one, but leaving raw steel tin tiles unsealed on purpose is a real design move right now. The tiles start silver-gray and slowly develop a mottled, slightly oxidized finish that looks genuinely industrial. It’s a slow patina that builds over months and ends up looking different in every kitchen.
This works best if your kitchen has dark cabinetry, concrete counters, or black hardware. Raw steel tiles run about $4 to $6 per square foot and you save money skipping the sealant. Fair warning: they will rust slightly near the sink if water sits on them. That’s either a bug or a feature depending on your aesthetic.
4. Copper Tin Tiles with a Dark Grout

Copper colored tin tiles are one of those things that photographs terribly in the box and looks really good once it’s actually on your wall with proper lighting. The warm tone bounces off pendant lights and candles in a way that silver and white tiles just don’t. You can find copper-finished tin tiles for around $4 to $7 per square foot.
Pair them with a dark charcoal or espresso grout if you’re using real tiles, and the contrast makes the copper pop hard. If you’re going peel-and-stick, look for copper versions with a faint hammered texture. The subtle texture catches light differently throughout the day, which keeps the wall looking interesting instead of flat.
Getting the surrounding wall color right matters just as much as the tile itself, and there’s solid guidance on copper and contrast in real kitchens.
5. Painted Black Tin Tiles

A matte black tin backsplash sounds risky but it’s one of the most forgiving options once it’s up. Minor scratches and grease smudges are almost invisible against a flat black surface, which makes it practical for the wall right behind your stove. Any pressed tin tile can be painted with a matte black spray paint or chalk-based paint before installation.
The look pairs well with warm wood cabinets, brass fixtures, or white appliances. I was skeptical about this one but a matte black backsplash in a small galley kitchen I helped a friend with made the space feel intentional and polished rather than cramped. Keep your cabinets light and the contrast does all the work.
If a full refresh is on your radar, there’s a practical guide on galley kitchen layouts that feel intentional without spending a fortune.
6. Alternating Tile Patterns on a Budget

Here’s what most tile-buying guides skip: you don’t have to use one single pattern across your whole backsplash. Mix two embossed tin tile patterns in the same color for a patchwork effect that reads as textured and layered from across the room. Try a diamond pattern tile alternating with a simple raised square for every other tile.
This works especially well if you’re buying end-of-run tiles or clearance stock at a hardware store, because you can often mix patterns that are the same size and color for a fraction of the cost. A mixed-pattern install can run as low as $60 for a standard backsplash if you’re picking up clearance tiles around $1.50 to $2 each.
More Ideas:
7. Tin Tiles with a Shiplap Border

The backsplash doesn’t have to end at the edge of the tile. Frame your tin tiles with a simple shiplap border painted the same color as your cabinets and suddenly the whole thing looks like an intentional design choice instead of a tile project. This works best when your tin tile area is relatively small, like just behind the stove or sink, and you want it to feel framed.
Thin shiplap boards run around $1.50 to $2 per linear foot at most lumber yards. Add four boards around your tin tile area and the whole project gets a built-in look for under $20 extra. The border also hides any uneven cuts at the edge of your tile run, which is genuinely helpful if this is your first time cutting tin.
8. Ceiling Tin Repurposed as a Backsplash

Old pressed tin ceiling tiles from antique shops or architectural salvage yards are one of the best-kept secrets in this whole category (this one is so underrated). They’re usually priced between $5 and $15 per tile depending on condition and source, and many are already aged with that warm oxidized patina people pay extra to fake.
The standard size is 24 by 24 inches, which covers a lot of wall fast. You’ll need to flatten any warped tiles under a heavy board overnight before installing. Look for these at estate sales, Habitat for Humanity ReStores, or salvage shops. The character in a genuinely old tile is something no reproduction tile can replicate.
That same vintage sourcing instinct applies throughout the home, and there are some great salvage finds that transform a kitchen‘s whole personality.
9. Tin Tile in a Herringbone Layout

The same basic tin tile looks like a completely different product when you lay it at a 45-degree angle in a herringbone pattern instead of a standard grid. Herringbone creates diagonal movement across the wall and makes even a plain embossed tile look dynamic and intentional. It’s one of those changes that’s entirely about installation angle and costs you nothing extra.
The tradeoff is more cuts and a longer install time. Budget an extra hour or two compared to a standard grid layout. The edge cuts will be angled, so you’ll need tin snips or a metal saw blade on a jigsaw. But the result reads as a designed kitchen, not a DIY project, and people will ask where you got your tiles.
10. Silver Tin Tiles with Open Wood Shelving

If you’ve already got open wood shelves above your counter, a silver or brushed aluminum tin tile backsplash underneath them creates a really layered and warm-but-modern look. The wood adds organic warmth and the silver metallic tile keeps things from going too rustic. It’s a contrast that works well in both farmhouse and modern kitchens.
Choose a tile with a fine diamond or subtle crosshatch embossed pattern rather than a heavy floral. The more restrained the pattern, the better it plays behind visible shelving where your eye is already doing a lot. Budget $100 to $150 for tiles in a standard 20-square-foot space plus sealant.
If you’re planning the layout around the shelves too, it helps to look at how open shelving styled above a counter works alongside a larger island setup.
More Ideas:
11. DIY Faux Tin with Metallic Paint and Texture Roller

You can fake the tin tile look with no tiles at all. A texture roller with an embossed geometric pattern, a coat of metallic silver or bronze craft paint, and two hours of your Saturday is all it takes. (Took me ages to figure this out, and I kicked myself when I finally saw how easy it was.) The result looks like individual tiles from across the room.
This option costs roughly $25 to $40 total: a texture roller for $10 to $15, metallic wall paint or craft paint for $10 to $20, and a small foam roller to apply the base coat. Prime your wall first with a gray primer so the metallic paint covers evenly. Seal with a matte polyurethane when done so it can handle kitchen steam.
12. Two-Tone Tin Tile Color Scheme

Pick two colors from your kitchen, one light and one darker, and paint half your tin tiles each color before installing in a checkerboard pattern. It sounds bolder than it looks in practice because the embossed texture reads the same across both colors and ties the whole thing together. Think cream and soft sage, or white and muted navy.
Use spray paint in a flat or satin finish for the most even coverage on embossed tin. Lay tiles on cardboard and paint before installing, never after. Two 12-ounce cans of spray paint cover roughly 30 tiles. Total cost for this variation on a standard backsplash runs $100 to $160 depending on your tile choice.
13. Tin Tiles Behind the Range Only

You don’t have to cover every inch of backsplash with tin. Installing tin tiles only behind your range as a focal point keeps the cost low and makes the area that needs the most protection also the most interesting part of your kitchen wall. A 24 by 36 inch panel behind a standard 30-inch range only takes about 6 square feet of tile.
At $4 to $6 per square foot for real tin, that’s $25 to $40 in material. Frame it with a simple trim piece painted to match your wall or cabinets, and it looks like a deliberate range hood surround even if you don’t have a range hood. This is also the best way to test if you like the look before committing to a full backsplash.
14. Aged Bronze Tin Tiles for a Traditional Kitchen

Bronze-toned tin tiles with a slightly aged or antiqued finish sit in a different category than shiny copper or bright gold. They’re warmer than silver but more subtle than a bright copper. The aged bronze look works especially well in traditional kitchens with dark wood cabinets, granite counters, and oil-rubbed bronze hardware.
You can buy tiles pre-finished in aged bronze for around $5 to $8 per square foot, or you can antique your own by painting regular tin tiles with a dark walnut gel stain wiped over a metallic base coat. The gel stain settles into the embossed recesses and creates natural-looking depth that highlights the pattern beautifully.
More Ideas:
15. Tin Tile Backsplash with Colored Grout Accents

Most people use white grout with tin tiles by default. Switch to a colored grout, specifically a warm terra cotta, deep charcoal, or sage green, and the lines between tiles become part of the design instead of just filler. The color accent in the grout lines picks up one color already in your kitchen and ties the backsplash into the room.
This only applies to real mortar-set tin tiles, not peel-and-stick. Unsanded grout works best for thin joints under 1/8 inch. A single bag of colored grout runs $15 to $25 and covers more than enough for a standard kitchen backsplash. It’s one of the smallest changes with the biggest visual payoff.
16. White Tin Tiles in a Small Kitchen

In a small kitchen where space is tight, white tin tiles do something really smart. The reflective surface of even matte white tin bounces light back into the room and makes the walls feel like they’re pushing out instead of closing in. High-gloss or slightly satin white tin tiles amplify this effect more than flat white.
Look for white pressed tin with a smaller-scale pattern like a 4-inch diamond repeat rather than a large 12-inch floral. In a small kitchen, a large repeat pattern can feel overwhelming. Small-scale patterns keep the eye moving and make the space feel busier in a good way. Budget $90 to $130 for tiles in a kitchen with about 18 square feet of backsplash.
For more ways to keep a compact kitchen feeling bright and open, there’s a useful collection of white kitchen design ideas that open up space.
17. Tin Tile Panel as a Kitchen Island Accent

If you have a kitchen island with a flat side panel, tin tile is one of the fastest ways to add texture and visual weight to that blank vertical surface. It’s a completely different application than a standard backsplash, but the same tiles work perfectly. A typical island side panel is about 24 by 36 inches, so you’re working with roughly 6 square feet.
Use construction adhesive instead of thinset for attaching tiles to an island panel since it’s a vertical non-wet-area surface. This approach avoids drilling into your island and the adhesive holds firmly. The whole panel can be done in an afternoon for $30 to $60 in material. It makes a plain island look built-in and considered.
While you’re updating the island’s look, there are some island accent ideas worth stealing that go beyond just the panel surface.
18. Hammered Tin Tiles for Texture Over Pattern

Instead of a classic embossed floral or geometric pattern, hammered tin tiles have an irregular, uneven surface that catches light in a more organic and random way. The effect is more subtle than a patterned tile from a distance, but up close it has a lot of life. It’s a good choice if you want the metallic look without a tile pattern that competes with other details in your kitchen.
Hammered tin tiles run slightly more than standard embossed tiles, usually $5 to $9 per square foot, but they’re worth it if your kitchen already has a lot going on visually. They’re especially good behind open shelving loaded with colorful dishes or plants where you want texture in the background, not a competing pattern.
More Ideas:
19. Removable Tin Tile Panels for Apartments

Beyond individual peel-and-stick tiles, you can buy or make full tin-look panels that mount to the wall with minimal hardware and come off cleanly when you move. Companies like Fasade and NuSteel make full backsplash panels in pressed tin patterns, usually around $30 to $60 per 18 by 24 inch panel. Two or three panels cover most standard kitchen backsplash areas.
These mount with small screws into the wall studs or with removable mounting strips. The panel version installs faster than individual tiles and looks more seamless. When you leave, patch two or three small holes versus 30 individual adhesive marks. For renters who want a real material look rather than the thinner peel-and-stick version, panels are the better call.
20. Tin Tile Backsplash with Under-Cabinet Lighting

This one pairs any tin tile option with LED strip lighting tucked under the upper cabinets pointing down at the backsplash. That combination, metallic embossed tile plus direct downlight, creates a shimmer and depth that no daytime photo does justice. The light catches every raised edge of the embossed pattern and makes even the most basic pressed tin look really intentional.
LED strip lights run $20 to $50 for a complete kitchen run. Plug-in versions tuck under the cabinet and need no hardwiring. Add this after your tile is up and it changes the whole feel of the kitchen after dark. It’s technically two projects but together they cost less than $200 total and the combined result is genuinely impressive.
If you want to keep building on that momentum, there are more small kitchen updates under two hundred dollars that pair just as well with a finished backsplash.
Final Thoughts on Tin Backsplash Ideas
You’ve got 20 real options now, ranging from a $25 painted texture trick to a full pressed tin install under $250. The common thread through all of them is that tin, whether real or faux, gives you something most backsplash materials can’t: light, texture, and a handmade quality that reads as intentional even on a tight budget.
Don’t wait until you’ve decided on the perfect option. Pick the one that fits where you are right now. If you’re renting, start with peel-and-stick panels this weekend. If you own, grab six tiles and try just the range area first. One small section tells you everything you need to know before committing to the full wall.
If you want more ideas like this, homelypop.com has a lot more where this came from. Kitchen updates, budget fixes, and real-home ideas that don’t require a renovation budget or a contractor.